

 Italiano
 Français
 Deutsch
 Español
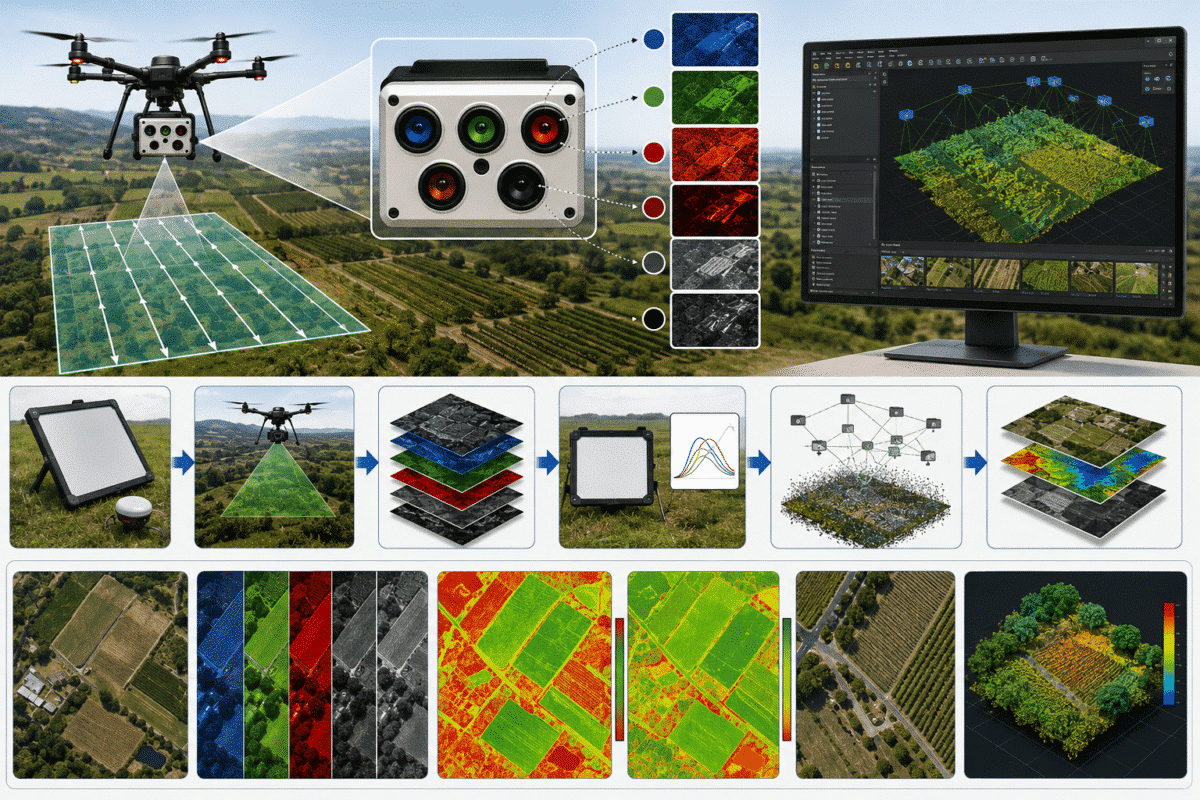
Processing MicaSense RedEdge-P imagery in Agisoft Metashape Professional provides a powerful workflow for precision agriculture, forestry, environmental monitoring, vegetation analysis and scientific remote sensing.
Unlike a conventional RGB camera, the RedEdge-P captures multiple narrow spectral bands together with a higher-resolution panchromatic image. When these images are correctly grouped, radiometrically calibrated and processed in Metashape, they can be used to create reflectance orthomosaics, vegetation indices such as NDVI and NDRE, Digital Surface Models and high-resolution pan-sharpened products.
However, multispectral processing requires several additional steps compared with normal drone photography.
This guide explains the complete MicaSense RedEdge-P Agisoft Metashape workflow, from importing the imagery and calibrating reflectance to building the orthomosaic, calculating vegetation indices and exporting the final multispectral GeoTIFF.
What Is the MicaSense RedEdge-P?
The MicaSense RedEdge-P is a professional multispectral sensor designed for drone-based remote sensing.
It captures five narrow multispectral bands:
- Blue: approximately 475 nm
- Green: approximately 560 nm
- Red: approximately 668 nm
- Red Edge: approximately 717 nm
- Near Infrared (NIR): approximately 842 nm
In addition, RedEdge-P includes a higher-resolution panchromatic band.
The multispectral imagers have a resolution of 1456 × 1088 pixels, while the panchromatic imager provides 2464 × 2056 pixels.
The panchromatic image can be used during post-processing to increase the spatial resolution of multispectral products through pan-sharpening.
Why Process RedEdge-P Data in Metashape?
Agisoft Metashape Professional can handle the complete photogrammetric processing chain locally, including:
- Multispectral image alignment
- Radiometric calibration
- MicaSense DLS2 information
- Calibrated Reflectance Panel data
- Point cloud generation
- DSM generation
- Multiband orthomosaics
- NDVI and NDRE calculation
- Raster transformations
- Pan-sharpening
- GeoTIFF export
This makes Metashape particularly useful when both accurate photogrammetric reconstruction and calibrated multispectral output are required from the same dataset.
Step 1: Capture Reflectance Panel Images
Radiometric calibration should begin in the field before the mapping mission.
The RedEdge-P kit can be used with a Calibrated Reflectance Panel (CRP) and the Downwelling Light Sensor 2 (DLS2).
Capture clear images of the calibrated reflectance panel immediately before the flight and, whenever possible, again after the mission.
When photographing the panel:
- Make sure the complete calibrated area is visible.
- Avoid shadows on the panel.
- Do not stand where your body blocks incoming light.
- Avoid reflections from nearby objects.
- Make sure the DLS2 also has an unobstructed view of the sky.
The panel provides a known reflectance reference, while DLS2 measurements help compensate for changes in illumination during the flight.
Step 2: Capture the Multispectral Drone Survey
Plan the flight with sufficient overlap and stable lighting conditions whenever possible.
Vegetation can be difficult to reconstruct photogrammetrically because leaves may move in the wind and agricultural fields can contain repetitive texture.
For this reason, generous image overlap is useful.
Also try to:
- Fly under relatively stable illumination.
- Avoid rapidly changing cloud shadows where possible.
- Keep the camera pointed consistently toward the ground.
- Use sufficient forward and side overlap.
- Avoid excessive drone speed.
- Ensure DLS2 has a clear view of the sky.
Step 3: Import All RedEdge-P Bands Together
Create a new project in Agisoft Metashape Professional.
Select:
Workflow > Add Photos…
Select all images from the RedEdge-P dataset, including the reflectance calibration images.
When prompted, choose:
Multi-camera system
This is important because one RedEdge-P capture consists of several synchronized images representing the different spectral bands.
Do not process each spectral band as an unrelated set of cameras.
Metashape uses image metadata to organize the synchronized captures into a multispectral camera system.
Understanding RedEdge-P Band Order
The raw RedEdge-P files use image suffixes corresponding to the individual sensors.
| Raw File Suffix | Band |
|---|---|
| _1 | Blue |
| _2 | Green |
| _3 | Red |
| _4 | Near Infrared |
| _5 | Red Edge |
| _6 | Panchromatic |
It is important not to assume that the raw file suffix order is the same as wavelength order.
After normal multispectral processing, the five-band output is organized in the conventional wavelength order:
- Blue
- Green
- Red
- Red Edge
- Near Infrared
This processed order is particularly important when creating vegetation-index formulas.
Step 4: Set Panchromatic as the Primary Channel
Before aligning the RedEdge-P imagery, select:
Tools > Set Primary Channel
and choose the:
Panchromatic channel
This is an important RedEdge-P-specific step.
The panchromatic sensor has higher spatial resolution than the individual multispectral sensors, making it particularly suitable as the primary channel used for photogrammetric image matching and alignment.
After changing the primary channel, continue with the normal Metashape processing workflow.
Step 5: Locate the Reflectance Panel
Before processing the complete survey, perform reflectance calibration.
Select:
Tools > Calibrate Reflectance…
Then click:
Locate Panels
Metashape will attempt to identify the calibrated reflectance panel automatically.
When successfully detected, Metashape masks the surrounding image and uses the panel area for calibration.
If the panel cannot be identified automatically, it can be masked manually.
Step 6: Enter the Panel Reflectance Values
The calibrated panel has known reflectance values for different spectral bands.
If Metashape already recognizes the panel calibration or the appropriate calibration information has been imported, these values may be populated automatically.
Otherwise, enter the values supplied with the panel calibration certificate.
It is important to use the calibration values associated with the specific panel rather than generic values copied from another target.
Step 7: Calibrate Reflectance
Inside:
Tools > Calibrate Reflectance…
Metashape provides options to use:
- Reflectance panels
- Sun sensor
When panel imagery and valid DLS2 metadata are available, both sources can be used for calibration.
The purpose of this operation is to convert raw digital numbers into values that are more representative of surface reflectance and compensate for illumination conditions.
This step is essential when vegetation indices or quantitative comparisons between surveys are required.
Why DLS2 Matters
Illumination can change during a drone flight because of clouds, solar angle and atmospheric conditions.
The DLS2 measures incoming light during image acquisition and records this information in the image metadata.
Metashape can use these measurements during reflectance calibration.
However, DLS2 should not be considered a replacement for proper panel capture. Using both the calibrated reflectance panel and DLS2 provides a stronger radiometric workflow, particularly when illumination varies during the mission.
Step 8: Align the RedEdge-P Images
After setting Panchromatic as the primary channel and performing the reflectance-calibration setup, select:
Workflow > Align Photos…
Metashape calculates camera positions and generates the initial tie point cloud.
After alignment, check that:
- The expected cameras are aligned.
- The complete field or survey area is reconstructed.
- No isolated camera groups are present.
- Camera positions are consistent with the flight path.
- The project coordinate system is correct.
Step 9: Optimize Cameras
If the project uses RTK coordinates, Ground Control Points or other reference information, configure the appropriate accuracy values and optimize the camera solution before generating the final products.
Run:
Tools > Optimize Cameras…
Camera optimization refines camera positions, orientations and calibration parameters based on the available photogrammetric and reference information.
Step 10: Build the Point Cloud and DEM
Continue with the normal Metashape Professional workflow:
Workflow > Build Point Cloud
and then:
Workflow > Build DEM
The elevation model is important because the multispectral orthomosaic needs an accurate reconstructed surface for correct orthorectification.
A DSM can also provide useful information alongside the spectral data, particularly for crop-height, forestry and vegetation-structure studies.
Step 11: Build the Multispectral Orthomosaic
Select:
Workflow > Build Orthomosaic
Metashape will generate a georeferenced multiband raster based on the reconstructed geometry and calibrated imagery.
For the standard RedEdge-P multispectral output, the resulting dataset contains five spectral layers:
- Blue
- Green
- Red
- Red Edge
- Near Infrared
This multiband orthomosaic can then be analyzed directly inside Metashape or exported to GIS and remote-sensing software.
Step 12: Calculate NDVI in Metashape
One of the most common vegetation indices is the Normalized Difference Vegetation Index (NDVI).
Using the processed RedEdge-P band order:
- Band 3 = Red
- Band 5 = NIR
The NDVI formula is:
(B5 – B3) / (B5 + B3)
Open:
Tools > Set Raster Transform…
and enter the formula in the Raster Calculator.
NDVI values generally range between -1 and +1 and are commonly used to evaluate vegetation vigor and canopy characteristics.
How to Calculate NDRE
RedEdge-P also captures a dedicated Red Edge band, allowing calculation of the Normalized Difference Red Edge Index (NDRE).
Using the processed band order:
- Band 4 = Red Edge
- Band 5 = NIR
The NDRE formula is:
(B5 – B4) / (B5 + B4)
NDRE can be particularly useful in dense or mature vegetation where NDVI may become less sensitive.
RGB Composite from RedEdge-P
A natural-color visualization can also be generated from the multispectral bands.
Use:
- Red = Band 3
- Green = Band 2
- Blue = Band 1
This produces an RGB-style composite from the narrow-band multispectral imagery.
Pan-Sharpening RedEdge-P Data in Metashape
One of the key advantages of RedEdge-P is its higher-resolution panchromatic sensor.
Metashape can use the panchromatic information to create a pan-sharpened multispectral dataset.
After the normal processing workflow, open:
Tools > Set Raster Transform
and apply the appropriate RedEdge-P pan-sharpening formulas.
The purpose of pan-sharpening is to combine the higher spatial resolution of the panchromatic band with the spectral information from the lower-resolution multispectral channels.
This can improve spatial detail for applications such as:
- Individual plant identification
- Canopy segmentation
- Machine-learning classification
- High-resolution crop monitoring
- Detailed environmental mapping
Keep in mind that the native multispectral resolution provides the most direct spectral measurement. Pan-sharpening introduces an additional transformation and should therefore be selected according to the analytical objective.
Exporting RedEdge-P Results
Once processing is complete, export the orthomosaic using:
File > Export > Export Orthomosaic
A multiband GeoTIFF is particularly useful because it preserves georeferencing and individual spectral layers for further analysis in applications such as:
- QGIS
- ArcGIS
- ENVI
- R
- Python-based remote-sensing workflows
If you created a raster transform such as NDVI, NDRE or pan-sharpened output, choose the appropriate Raster Transform export option.
Common RedEdge-P Processing Mistakes
Importing Bands Separately
The synchronized band images should be treated as a multispectral camera system rather than unrelated photographs.
Forgetting the Calibration Panel Images
Panel images should be included when importing the dataset so Metashape can use them for reflectance calibration.
Using the Wrong Primary Channel
For RedEdge-P, set the Panchromatic channel as the Primary Channel before alignment.
Confusing Raw and Processed Band Order
The raw file suffix order is not the same as the final wavelength-based order used for multispectral calculations.
Skipping Reflectance Calibration
Uncalibrated imagery may still produce attractive maps, but quantitative vegetation-index comparisons become much less reliable.
Using NDVI as a Universal Agronomic Diagnosis
NDVI is a useful vegetation indicator, but it does not directly diagnose a specific disease, nutrient deficiency or irrigation problem without additional agronomic interpretation and field validation.
Final Recommended Workflow
For reliable MicaSense RedEdge-P processing in Agisoft Metashape:
- Capture calibrated reflectance panel images before and after the mission.
- Ensure DLS2 has an unobstructed view of incoming light.
- Capture the survey with sufficient overlap.
- Import all RedEdge-P bands together as a multi-camera system.
- Include the calibration images.
- Set Panchromatic as the Primary Channel.
- Locate the reflectance panel.
- Load or enter the correct panel reflectance values.
- Run reflectance calibration using panel and DLS2 data where available.
- Align the images.
- Optimize cameras and reference information where required.
- Build the point cloud and DEM.
- Build the multispectral orthomosaic.
- Calculate NDVI, NDRE or other vegetation indices.
- Apply pan-sharpening where additional spatial resolution is useful.
- Export the final multiband GeoTIFF or transformed raster.
With correct radiometric calibration and photogrammetric processing, Agisoft Metashape Professional and MicaSense RedEdge-P provide a flexible workflow for converting drone imagery into georeferenced multispectral information suitable for precision agriculture, forestry, environmental monitoring and scientific research.
Frequently Asked Questions
Does Agisoft Metashape support MicaSense RedEdge-P?
Yes. Metashape Professional can process, align and radiometrically calibrate MicaSense RedEdge-P imagery and generate multiband orthomosaics, elevation models and vegetation indices.
Which RedEdge-P channel should be primary in Metashape?
Set the Panchromatic channel as the Primary Channel before aligning RedEdge-P imagery.
How many spectral bands does RedEdge-P have?
RedEdge-P captures five narrow multispectral bands — Blue, Green, Red, Red Edge and Near Infrared — plus a separate higher-resolution panchromatic band.
Can Metashape calculate NDVI from RedEdge-P?
Yes. In the processed five-band output, NDVI can be calculated using (B5 – B3) / (B5 + B3), where Band 5 is NIR and Band 3 is Red.
Can Metashape calculate NDRE?
Yes. Using the processed band order, NDRE can be calculated with (B5 – B4) / (B5 + B4), where Band 5 is NIR and Band 4 is Red Edge.
Do I need a reflectance panel if I use DLS2?
Using a calibrated reflectance panel remains strongly recommended. The panel provides a known ground reference, while DLS2 helps account for changing illumination during image acquisition.
Can Metashape pan-sharpen RedEdge-P imagery?
Yes. Metashape can use RedEdge-P’s high-resolution panchromatic channel to create pan-sharpened multispectral output through the Raster Transform workflow.
What format should I export RedEdge-P data from Metashape?
A multiband GeoTIFF is commonly used because it preserves georeferencing and spectral layers for analysis in GIS and remote-sensing software.