

 Italiano
 Français
 Deutsch
 Español
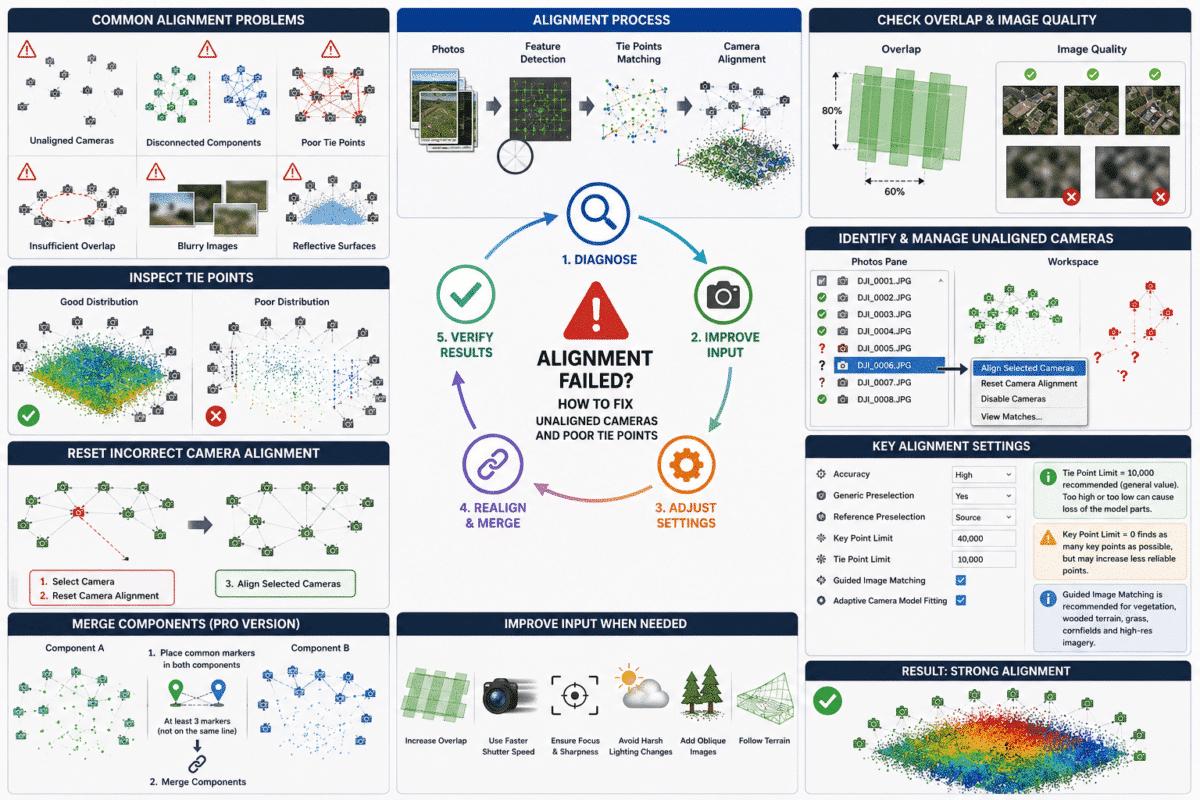
Agisoft Metashape alignment failed? Unaligned cameras, disconnected image groups and weak tie points are among the most common problems encountered when processing drone surveys and close-range photogrammetry projects in Agisoft Metashape.
Sometimes only a few photographs fail to align. In other cases, hundreds of images may align into separate components, or the cameras appear in obviously incorrect positions even though Metashape reports that alignment completed successfully.
The good news is that failed alignment does not always mean that the entire project needs to be processed again.
Agisoft Metashape provides several tools for diagnosing and correcting alignment problems, including image-quality analysis, Align Selected Cameras, Reset Camera Alignment, Guided Image Matching, Reference Preselection and component merging.
This guide explains how to fix unaligned cameras and poor tie points in Agisoft Metashape and, more importantly, how to identify the real cause before changing processing parameters.
What Happens During Align Photos in Metashape?
When you select:
Workflow > Align Photos…
Metashape performs several important operations.
It detects distinctive features inside each photograph, searches for corresponding features in overlapping images and uses these matches to estimate the position and orientation of every camera.
The resulting matched features are used to generate a tie point cloud.
At the same time, Metashape estimates the internal camera calibration and performs bundle adjustment to calculate a geometrically consistent photogrammetric block.
If there are not enough reliable matches between photographs, some cameras cannot be positioned and remain unaligned.
Why Do Some Photos Fail to Align?
The most common causes include:
- Insufficient image overlap
- Blurred or out-of-focus photographs
- Large differences in viewing angle
- Repetitive textures
- Water or reflective surfaces
- Moving vegetation
- Images captured too far from the subject
- Incorrect camera calibration groups
- Large illumination changes
- Too few reliable tie points
- Incorrect image preselection
Before changing every parameter in the Align Photos dialog, try to identify which of these conditions is actually present in the dataset.
Step 1: Identify the Unaligned Cameras
After alignment, open the Photos pane or Workspace pane.
Aligned cameras have an estimated position and orientation, while unaligned cameras remain without a solved camera transform.
Look at where the failed images occur in the flight sequence.
If the unaligned photographs are concentrated at:
- The beginning or end of a flight line
- A gap between flight lines
- A water surface
- A dense forest area
- A region containing repetitive roofs or fields
the pattern can immediately suggest the cause.
If every failed image is located in the same physical part of the survey, insufficient overlap or difficult surface texture is often more likely than a software problem.
Step 2: Check Image Quality
Blurred photographs are one of the first things to check.
Metashape includes an automatic image-quality estimation tool.
In the Photos pane:
- Select the photographs.
- Right-click the selection.
- Choose Estimate Image Quality.
Metashape evaluates image sharpness and displays a quality value for each photograph.
Agisoft recommends disabling images with an estimated quality value below approximately 0.5.
Poor photographs can be caused by:
- Motion blur
- Slow shutter speed
- Incorrect focus
- Camera vibration
- Strong atmospheric haze
- Overexposure or underexposure
Do not assume that adding more blurry photographs will improve alignment. Low-quality images can introduce unreliable feature observations.
Step 3: Try Align Selected Cameras
If only a small number of photographs failed to align, there is usually no reason to restart the entire project immediately.
Select the unaligned images and use:
Align Selected Cameras
from the camera context menu.
This tells Metashape to attempt alignment of those cameras using the already established photogrammetric block.
This method can work particularly well when most neighboring photographs have already been successfully aligned.
What If a Camera Is Aligned but in the Wrong Position?
An incorrectly positioned camera should be treated differently from a camera that never aligned.
If Metashape has placed an image in an obviously incorrect location:
- Select the incorrectly positioned camera.
- Right-click and select Reset Camera Alignment.
- Select the camera again.
- Choose Align Selected Cameras.
Resetting the camera alignment removes its current estimated transform so Metashape can attempt to calculate a new solution.
This is safer than leaving a clearly incorrect camera inside the block.
Step 4: Check Image Overlap
No processing setting can fully compensate for photographs that do not share enough common visible features.
For general aerial photogrammetry, approximately:
- 80% forward overlap
- 60% side overlap
is a useful baseline.
Complex scenes often require more.
Construction sites, forests, quarries, urban environments and steep terrain may benefit from approximately 80–85% forward overlap and 70–80% or more side overlap.
If two image groups simply do not contain common visible features, increasing Key Point Limit or changing alignment accuracy cannot create observations that were never captured.
Step 5: Review Align Photos Settings
Open:
Workflow > Align Photos…
The most important alignment settings include:
- Accuracy
- Generic Preselection
- Reference Preselection
- Key Point Limit
- Tie Point Limit
- Guided Image Matching
- Adaptive Camera Model Fitting
Alignment Accuracy
At High accuracy, Metashape performs feature detection using the original image resolution.
Medium and lower settings downscale the photographs before feature detection.
If a difficult dataset fails at Medium or Low accuracy, retrying selected cameras at High accuracy may help because features can be localized from the full-resolution imagery.
The Highest setting should not automatically be selected. It upscales the imagery and is considerably more computationally demanding, so Agisoft primarily recommends it for exceptionally sharp datasets and specialized applications.
Generic Preselection
Generic Preselection reduces the number of image pairs that need to be compared.
Metashape performs an initial lower-resolution comparison to identify image pairs that are likely to overlap.
For large datasets this can significantly reduce processing time.
If you suspect that legitimate overlapping pairs were missed in a difficult dataset, testing alignment on the problematic subset with different preselection settings can sometimes help.
Reference Preselection
For geotagged drone imagery, camera coordinates can help Metashape identify likely neighboring photographs.
This is especially useful in regular aerial mapping projects where GPS or RTK positions are available.
Reference information should still be checked before relying on it.
If camera coordinates are incorrect, strongly biased or associated with the wrong coordinate system, they can provide misleading information about which images are likely to overlap.
Key Point Limit
Key Point Limit controls the maximum number of image features Metashape considers per photograph.
It can be tempting to set this value to zero, which allows Metashape to detect as many features as possible.
However, more key points do not automatically mean better alignment.
Agisoft notes that an unlimited value can also produce a large number of less reliable features.
Therefore, increasing Key Point Limit should be treated as a troubleshooting option rather than a universal solution.
Tie Point Limit
Tie Point Limit controls the maximum number of matching points retained for each image.
In the current Metashape 2.3 manual, Agisoft recommends approximately 10,000 as a general value.
Setting the limit to zero disables tie-point filtering, but this is not automatically better.
Agisoft warns that both excessively high and excessively low values can cause problems in some parts of a project.
The goal is a strong, well-distributed network of reliable matches, not simply the largest possible number of points.
Guided Image Matching
For difficult datasets, one particularly useful option is:
Guided Image Matching
Agisoft specifically notes that Guided Image Matching can improve results for:
- Wooded terrain
- Grass
- Cornfields
- Other vegetation
- High-resolution professional imagery
- Spherical cameras
The feature allows Metashape to increase effective feature matching without the same processing penalty as simply increasing the Key Point Limit dramatically.
For agricultural or forest projects with weak tie points, it is therefore worth testing before resorting to extreme feature-limit settings.
Adaptive Camera Model Fitting
Adaptive Camera Model Fitting allows Metashape to determine which camera-calibration parameters can be estimated reliably from the image network.
This can be particularly important in aerial surveys, where camera geometry may be relatively weak because most photographs are captured with similar orientation.
Allowing too many poorly constrained calibration parameters to vary can create unstable adjustment.
For most normal projects, keeping Adaptive Camera Model Fitting enabled is therefore a sensible starting point.
Step 6: Inspect Tie Points
After alignment, inspect the tie point cloud.
A healthy aerial block should generally show a reasonably continuous distribution of tie points across the surveyed area.
Warning signs include:
- Large areas containing almost no tie points
- Dense clusters in only one part of the project
- Long disconnected groups
- Obviously incorrect points far away from the reconstruction
You can also compare the matches between two photographs using:
View Matches…
from the image context menu.
This can help determine whether neighboring images actually contain sufficient reliable correspondences.
Poor Tie Points from Water
Water is particularly difficult for photogrammetry.
Its appearance can change between images because of:
- Reflections
- Waves
- Sun glint
- Moving surface patterns
A camera looking primarily at open water may therefore fail to produce enough stable matches for normal photogrammetric alignment.
If the camera has reliable position and orientation metadata, newer Metashape versions provide another option in some circumstances.
Align Cameras by Reference
Starting with Metashape 2.2, Agisoft provides:
Align Cameras by Reference
This tool can assign alignment to otherwise unaligned images when valid camera coordinates and orientation angles are available.
Select the unaligned cameras in the Reference pane and choose:
Align Cameras by Reference
This can be particularly useful for photographs over water where normal feature matching fails.
However, these cameras have not been photogrammetrically solved through tie points in the normal way. They are primarily useful when their known pose is sufficient for tasks such as orthomosaic generation or texturing over an existing surface.
What Are Alignment Components?
Sometimes Metashape successfully aligns all or most photographs but separates them into multiple Components.
This means that each group has enough internal tie points to reconstruct itself, but there are not enough reliable matches connecting the groups together.
Typical causes include:
- Insufficient overlap between flights
- Top and bottom parts of an object captured separately
- Different illumination conditions
- Strongly different camera angles
- Disconnected survey areas
How to Merge Alignment Components
In Metashape Professional, components can be connected manually using common markers.
Place corresponding markers on features that are visible in both components.
Agisoft requires at least three markers that are not located on the same line.
After the same physical points have been marked in both components, select the components in the Workspace pane and use:
Merge Components
This is particularly useful for close-range object reconstruction where separate image groups are difficult to connect automatically.
Should You Reset the Entire Alignment?
Not necessarily.
If only a few photographs failed, use Align Selected Cameras first.
If one or several cameras are incorrectly positioned, reset only those cameras and realign them.
Use:
Reset current alignment
inside the Align Photos dialog only when you intentionally want to discard the existing key points, matches and alignment and start the alignment process again from scratch.
This option removes the previous matching information.
Adding New Photos to an Already Aligned Project
Sometimes the best solution is to capture additional photographs covering the problem area.
Metashape supports incremental image alignment.
If you know in advance that additional images may need to be added, enable:
Keep key points
in:
Tools > Preferences > Advanced
before the initial alignment.
After adding the new photographs, run Align Photos again with:
Reset current alignment disabled
so Metashape can attempt to connect the new images to the existing aligned block.
What If Increasing Key Points Still Does Not Work?
This is an important diagnostic result.
If you substantially increase feature detection and the same cameras still cannot align, the problem may not be the number of detected features.
The dataset may simply lack sufficient geometric overlap.
For example, two photographs may each contain thousands of excellent features but still have almost no common area.
Photogrammetry requires matching features visible from multiple viewpoints, not just feature-rich individual photographs.
Common Alignment Mistakes
Increasing Every Setting to Maximum
Highest accuracy, unlimited key points and unlimited tie points do not automatically produce the best solution.
Keeping Blurred Images Enabled
More photographs are useful only when they contain reliable image information.
Assuming GPS Coordinates Guarantee Alignment
GPS helps estimate which photographs may overlap, but normal photogrammetric alignment still depends on common visible image features.
Using Too Little Side Overlap
A survey may align perfectly along each individual flight line but split into strips because neighboring lines do not share enough image content.
Ignoring Camera Calibration Groups
Images from different physical cameras or significantly different surveys should be organized into appropriate calibration groups.
Trying to Fix Missing Photography with Processing Settings
If the dataset does not contain sufficient viewpoints, the best technical solution may be to capture additional photographs.
Recommended Troubleshooting Workflow
If Metashape alignment fails, use the following sequence:
- Identify exactly which cameras failed.
- Check whether failures correspond to one physical area.
- Estimate image quality and disable clearly poor images.
- Check overlap with neighboring photographs.
- Try Align Selected Cameras.
- Reset and realign cameras that are positioned incorrectly.
- Review Generic and Reference Preselection.
- Use High accuracy for difficult selected images when appropriate.
- Review Key Point and Tie Point limits rather than simply maximizing them.
- Try Guided Image Matching for vegetation or difficult high-resolution imagery.
- Inspect tie point distribution and View Matches.
- Check whether the alignment has split into Components.
- Merge components using common markers when appropriate.
- Capture additional images if the original dataset lacks sufficient overlap.
How to Prevent Alignment Problems During Drone Surveys
The best alignment fix happens before processing.
During image acquisition:
- Use sufficient frontlap and sidelap.
- Capture sharp images.
- Use fast enough shutter speeds.
- Avoid sudden flight-height changes.
- Use terrain following in areas with large elevation variation.
- Add oblique images for complex 3D structures.
- Consider cross-grid flights for difficult sites.
- Avoid relying on featureless water surfaces.
- Check the dataset before leaving the site whenever possible.
Additional photographs can be disabled later if they are unnecessary. Missing viewpoints cannot be reconstructed after the survey is finished.
Final Recommendations
If Agisoft Metashape fails to align cameras, do not immediately restart the entire project with every processing parameter set to maximum.
First determine whether the problem is caused by image quality, insufficient overlap, weak texture, camera calibration or disconnected flight geometry.
For a small number of failed photographs, Align Selected Cameras should normally be the first recovery attempt.
For cameras that are already aligned incorrectly, use Reset Camera Alignment followed by Align Selected Cameras.
If the project is divided into components, investigate whether enough common features exist to connect them or use common markers in Metashape Professional.
Most importantly, remember that successful photogrammetric alignment depends on sharp photographs, sufficient overlap and strong camera geometry. Processing settings can improve the use of available information, but they cannot replace image observations that were never captured.
Frequently Asked Questions
Why are some cameras not aligned in Metashape?
The most common causes are insufficient image overlap, poor image quality, weak or repetitive texture and an insufficient number of reliable tie points between neighboring photographs.
How do I align unaligned cameras in Metashape?
Select the unaligned images and choose Align Selected Cameras from the context menu. This attempts to connect them to the existing aligned image block.
How do I fix an incorrectly aligned camera?
Select the camera, use Reset Camera Alignment and then run Align Selected Cameras again.
Should I increase Key Point Limit if photos do not align?
It can help in some datasets, but more key points do not automatically improve alignment. Agisoft notes that unlimited feature detection can also introduce more unreliable points.
What Tie Point Limit should I use?
The current Metashape 2.3 manual recommends approximately 10,000 as a general value. The appropriate setting can still depend on the dataset and workflow.
What is Guided Image Matching?
Guided Image Matching increases effective feature matching without the same processing cost as simply detecting extremely large numbers of key points. Agisoft specifically recommends considering it for vegetation, high-resolution imagery and some difficult camera types.
Why did my Metashape project split into components?
Components are created when image subsets align internally but do not contain enough reliable tie points to connect with each other.
Can I merge two alignment components?
Yes. In Metashape Professional, common markers can be placed in both components. Agisoft specifies at least three non-collinear markers before using Merge Components.
Can Metashape align photos over water?
Normal feature-based alignment may fail over water because the visible surface changes between photographs. In Metashape 2.2 and newer, Align Cameras by Reference can be used in specific cases when reliable camera coordinates and orientation angles are available.
Can Metashape fix insufficient overlap?
Not completely. If neighboring photographs do not share enough common image content, no processing parameter can create missing viewpoints. Additional photography may be required.