Working without GPS data doesn’t mean your 3D reconstruction has to be inaccurate. With Agisoft Metashape, you can manually georeference a model by using known distances, scale bars, and Ground Control Points (GCPs). Whether you’re digitizing historical photos, indoor scans, or archival data, this guide will walk you through the step-by-step process to create spatially referenced models without any geotags or EXIF GPS data.
1. Why Georeferencing Matters
Georeferencing aligns your 3D model to a real-world coordinate system. Without GPS data from the drone or camera, your model will be in an arbitrary coordinate space. Manual georeferencing enables you to:
- Overlay the model with GIS or CAD data
- Ensure consistent scale and orientation
- Export measurements with real-world units (meters or feet)
2. Preparing the Project Without GPS
Start by creating your project as usual:
- Import and align photos
- Build sparse cloud and optimize cameras
- Do not rely on image metadata—skip GPS import
Once your alignment is complete, you’ll notice the model is floating in arbitrary space with no units or direction.
3. Method 1: Using Scale Bars for Simple Scaling
If you don’t need geographic coordinates but want real-world scale (e.g. building height), use scale bars between known points in the scene.
- Mark two or more points in multiple images
- Go to Tools → Markers → Add Scale Bar
- Enter the known distance in meters or feet
Metashape will use this to rescale the model, which is sufficient for relative measurements and orthomosaics that don’t need geolocation.
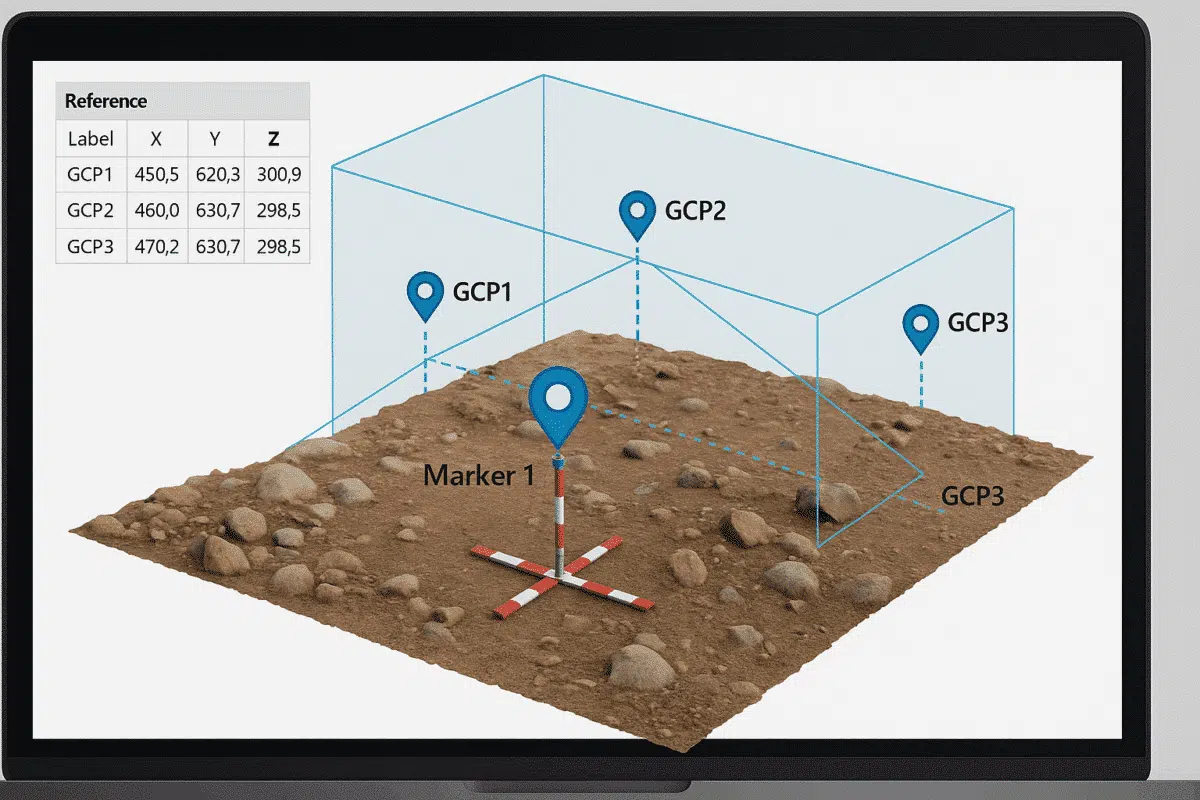
4. Method 2: Using GCPs for Full Georeferencing
If you have access to known ground coordinates (even just 3–4 points), you can use GCPs for full spatial referencing. These coordinates may come from:
- Total station survey
- Topographic maps
- Digitized plans
- GNSS measurements (manual)
Steps:
- Add GCPs to the project via Tools → Import Markers
- Include columns for Marker Label, X, Y, Z
- Pin each marker manually in at least 3–4 photos
- Set coordinate system via Reference → Settings
- Click Update Transform to apply georeferencing
After transformation, your model will align correctly in real-world space. You can now export data in EPSG codes like UTM, WGS84, or local CRS.
5. Checking and Adjusting Accuracy
After transformation, check the error in the Reference pane. For each marker, you’ll see residuals in X, Y, Z. Ideally, errors should be below 1–3 cm for accurate projects.
If needed, adjust marker positions and re-optimize cameras to minimize reprojection error.
6. Exporting Georeferenced Outputs
With the model now scaled and georeferenced, you can generate:
- Orthomosaics (GeoTIFF with coordinates)
- Digital Elevation Models (DEM)
- 3D Models (OBJ, FBX, Cesium 3D Tiles)
- Point clouds (LAS/LAZ)
Ensure you select the correct output CRS and resolution before export.
7. Bonus: Using Known Axis Orientation
If your project only needs approximate orientation, you can rotate the model manually:
- Select model → Right-click → Transform
- Rotate or scale until aligned to desired direction
- Add a marker at origin and export accordingly
This is useful for aligning the model with building plans or arbitrary CAD systems.
Conclusion
Even without GPS data, Agisoft Metashape gives you multiple tools to georeference your models. From scale bars to full GCP-based workflows, you can build accurate, real-world aligned outputs for surveying, architecture, and documentation. With a few manual steps and known control points, your projects can achieve high precision—without a single geotag.