Agisoft Metashape is a powerful photogrammetry software that allows users to create 3D models, orthophotos, and digital elevation models from aerial and terrestrial imagery. Once your project is processed, one of the most important tasks is exporting an image from Agisoft Metashape. This can include exporting an orthophoto, a DEM, or even a textured model view. In this guide, you will learn step by step how to export different types of images, which settings to choose, and how to ensure the best quality for your final output.
Understanding What You Can Export from Metashape
Before diving into the process, it’s important to clarify what Metashape means by “image export.” The software provides several options:
- Orthophotos – High-resolution georeferenced images created by stitching together processed photos.
- Digital Elevation Models (DEM) – Representations of terrain that can be exported as raster images.
- Textured Models – 3D meshes with applied textures, which can be exported as snapshots or full raster textures.
- Current View Screenshot – A quick way to save what you see in the model view as a 2D image.
Each type of export serves a different purpose: orthophotos and DEMs are typically used in GIS applications, while snapshots and textures are useful for visualization and presentations.
Step-by-Step Guide to Exporting an Orthophoto
The most common type of image export in Metashape is the orthophoto. Follow these steps:
- Process your project – Make sure photos are aligned, a dense cloud is built, and DEM/orthomosaic generation is complete.
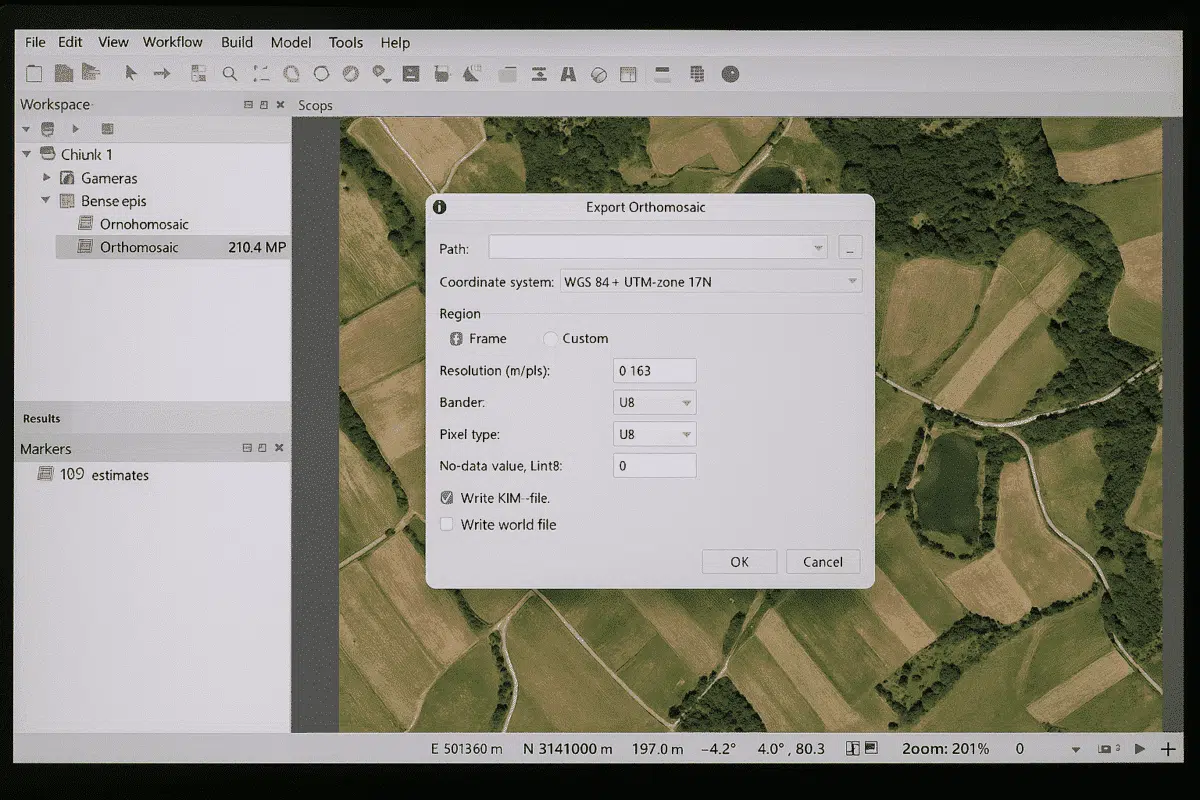
- Go to File → Export → Export Orthomosaic.
- Select the coordinate system – Choose the correct projection (e.g., WGS84, UTM) to ensure compatibility with GIS software.
- Define the export area – You can export the full extent or crop to a selected region.
- Choose the file format – Recommended: GeoTIFF (.tif) for georeferenced exports. Other options include JPEG and PNG for lighter outputs.
- Set resolution – Adjust pixel size if needed. Smaller pixel size = higher resolution but larger file size.
- Click OK – The software will generate and export the orthophoto.
Once exported, the orthophoto can be directly imported into GIS software like QGIS, ArcGIS, or AutoCAD Civil 3D for analysis and mapping.
How to Export a DEM as an Image
A Digital Elevation Model (DEM) represents terrain height values and is another crucial output from Metashape. To export it as an image:
- Make sure a DEM has been generated in your project.
- Click on File → Export → Export DEM.
- Select the coordinate system and file format. GeoTIFF (.tif) is again the preferred choice.
- Adjust resolution and extent depending on project requirements.
- Save the exported DEM to your chosen folder.
Exported DEMs are widely used in engineering, geology, and construction projects. They provide valuable information about terrain shape, slopes, and volumes.
Exporting a Model View as an Image
Sometimes, you may only need a snapshot of your 3D model to use in a presentation or report. In this case, you don’t need to generate orthophotos or DEMs. Instead:
- Adjust the 3D model view in Metashape to the desired angle.
- Go to File → Export → Export Raster.
- Select the resolution (higher values produce sharper images).
- Save as PNG or JPEG.
This option is useful when you want to highlight details of the mesh or textured model, without requiring georeferenced data.
Best Practices for Exporting Images in Metashape
To ensure the best results when exporting, consider the following tips:
- Choose GeoTIFF for GIS workflows – It preserves spatial reference and ensures compatibility with mapping tools.
- Use JPEG for lighter sharing – If you need to quickly send results, JPEG reduces file size significantly.
- Check resolution settings – Too high resolution may generate unnecessarily large files, while too low resolution may lose detail.
- Crop the export area – Exporting only the area of interest saves space and improves performance in GIS software.
- Organize outputs – Save orthophotos, DEMs, and model views in separate folders for better project management.
By following these best practices, you ensure that your exports are both accurate and practical for real-world use.
Common Issues and How to Solve Them
Sometimes, users face difficulties while exporting images from Metashape. Here are some common issues and solutions:
- Exported file is too large – Reduce resolution or crop the export area.
- No georeference in output – Ensure that your project has Ground Control Points (GCPs) or a defined coordinate system before export.
- Colors appear dull – Increase texture quality or check compression settings when exporting JPEGs.
- Software crashes during export – Split large datasets into smaller chunks and export separately.
These simple troubleshooting steps can save time and ensure successful exports.
Conclusion: Exporting Images from Metashape Made Easy
Knowing how to export images from Agisoft Metashape is a key skill for anyone working with photogrammetry. Whether you are generating orthophotos for GIS, DEMs for engineering, or simple snapshots for presentations, Metashape provides flexible options to match your needs. By mastering the export process, you can ensure your outputs are accurate, professional, and ready for use in real-world applications.
Ready to improve your workflow? Start practicing with different export settings in Metashape and choose the formats that best fit your industry, from surveying to archaeology to 3D modeling.