Agisoft Metashape Professional is widely used for photogrammetry, 3D modeling, topographic mapping, and geospatial analysis. One of the most important steps in processing georeferenced data is choosing and correctly converting between coordinate systems. Whether you work with drone RTK/PPK data, ground control points (GCPs), or GIS datasets, understanding how to manage coordinate systems in Metashape ensures accurate results, reliable elevation data, and compatibility with other software like QGIS, ArcGIS, AutoCAD, or Civil 3D.
This article explains how to convert between different coordinate systems in Agisoft Metashape, including WGS84 (latitude/longitude), UTM, EPSG-based projected systems, local/site coordinates, and height above geoid. You’ll also learn how to reproject DEMs, orthomosaics, GCPs, and export correctly formatted data.
Understanding Coordinate Systems in Metashape
Before performing conversions, it’s essential to understand the types of coordinate systems involved in photogrammetry:
1. Geographic Coordinate Systems (GCS)
- Expressed in latitude, longitude, and ellipsoidal height.
- Example: WGS84 (EPSG:4326).
- Used by GPS devices and drones, especially DJI RTK models.
2. Projected Coordinate Systems (PCS)
- Convert the curved Earth surface into a flat map.
- Units are in meters or feet, ideal for surveying and mapping.
- Example: UTM Zone 32N (EPSG:32632), Web Mercator, State Plane, etc.
3. Vertical Datums and Height Systems
- Ellipsoidal height (from GNSS) vs Orthometric height (height above geoid/mean sea level).
- Geoid models (EGM96, EGM2008, national geoids) are sometimes required for conversion.
4. Local Coordinate Systems
- Used for indoor scanning, heritage documentation, construction sites.
- Not aligned to global geodesy—require transformation to real-world CRS if needed.
How to Set or Change the Coordinate System in Metashape
Step 1: Load Your Data
- Import photos via Workflow > Add Photos.
- Import GCPs/file coordinates via Tools > Import Markers.
- Ensure metadata includes GPS EXIF or external coordinate data.
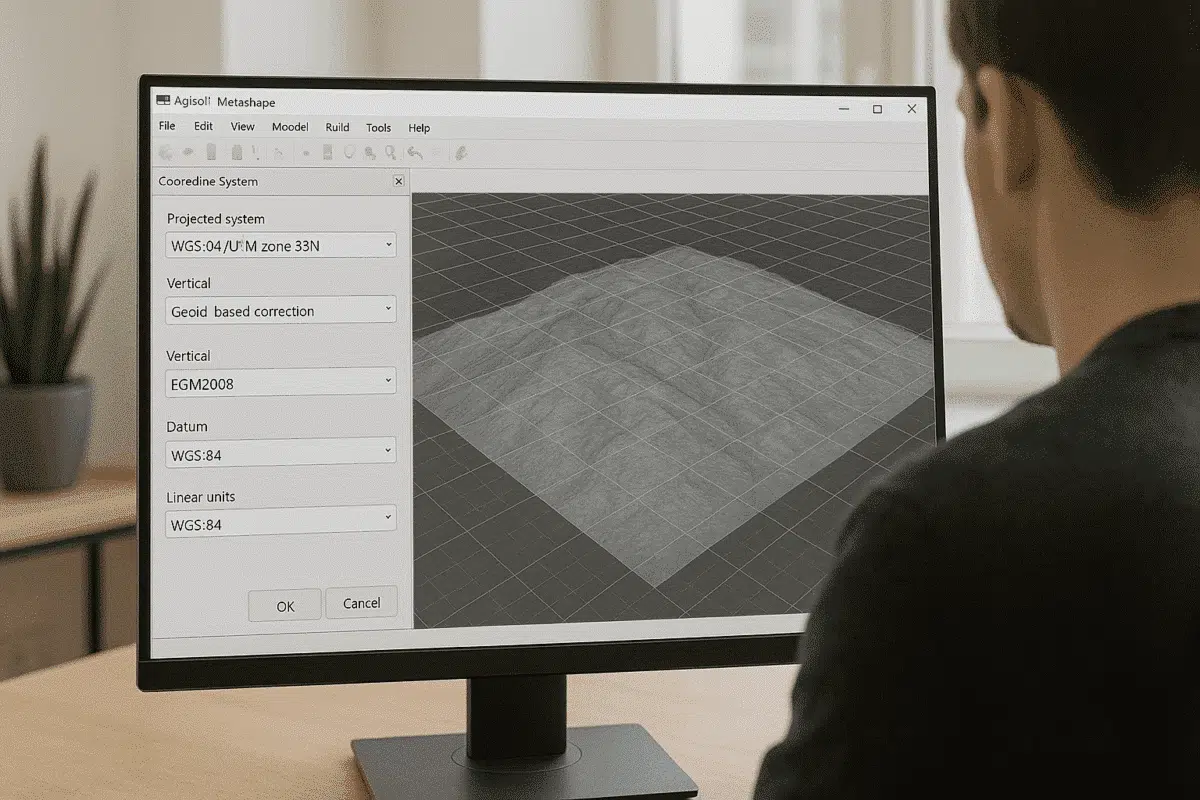
Step 2: Define the Project Coordinate System
- Open the Reference Pane.
- Click Settings > Coordinate System (…).
- Select the CRS from EPSG list or custom .prj file.
- If using geoid heights, enable “Use Height Above Geoid” and load a .tif geoid file.
Step 3: Reproject Photo or GCP Coordinates
When you change the coordinate system, Metashape asks if you want to:
- Convert coordinates (transform existing values to the new system)
- Preserve coordinates (keep numeric values but change CRS label)
Always choose Convert when switching from WGS84 (lat/long) to UTM meters or vice versa.
Converting Between Coordinate Systems: Practical Examples
Example 1: WGS84 (GPS) to UTM for Mapping Projects
- Import images containing GPS coordinates.
- Go to Reference Settings → Change from EPSG:4326 (WGS84) to EPSG:32633 (WGS84 / UTM Zone 33N).
- Select Convert when prompted.
Now all camera positions and GCPs are in meters, suitable for surveying, DEMs and CAD export.
Example 2: Applying Geoid-Based Elevations (RTK + Orthometric Heights)
- Download a geoid model (e.g. EGM96 .tif).
- Reference Pane > Settings > Check “Use Height Above Geoid”.
- Load geoid file and apply.
This automatically converts ellipsoidal height (h) to orthometric height (H = h – geoid value).
Example 3: Working in Local Coordinates and Converting to Real-World CRS
- Process model in local coordinates (default Metashape space).
- Add GCPs with real-world coordinates.
- Mark GCPs on images and optimize alignment.
- Metashape transforms the model to match global coordinates.
Converting Coordinate Systems for Outputs (DEM, Orthomosaic, 3D Models)
Export DEM or Orthomosaic in a Different CRS
- Go to File > Export DEM/Export Orthomosaic.
- Click “Projection” and choose desired CRS (EPSG code).
- Export as GeoTIFF, preserving georeferencing.
Export Point Cloud or Mesh with Reprojection
- File > Export Points or Export Model.
- Select format (LAS, TXT, DXF, OBJ, etc.).
- Enable “Export in Project CRS” or choose new CRS from dropdown.
Tips for Accurate Coordinate Transformations
- Use correct EPSG codes based on country and projection.
- When working with national systems (ED50 Italy, NAD83 USA), use official datum transformations.
- Ensure GCP coordinate system matches project CRS exactly.
- Always enable “height above geoid” if GCPs use orthometric height.
- If using DJI RTK drones, be aware that altitude is usually ellipsoidal.
Conclusion: Master Coordinate Conversion for Accurate GIS Results
Converting between coordinate systems in Agisoft Metashape is essential for aligning drone imagery, GCPs, DEMs, and GIS datasets. Whether you’re transforming WGS84 GPS data to UTM for surveying, applying a geoid model for real height above sea level, or exporting a model in CAD-friendly coordinates, using the correct workflow ensures precision and industry compatibility.
By combining proper CRS selection, geoid integration, and accurate GCP placement, you can produce highly reliable geospatial models ready for analysis, engineering, and professional reporting.