Agisoft Metashape is one of the most advanced photogrammetry software solutions available today, used by professionals worldwide to generate highly accurate 3D models from photographs. One of the most critical steps in the photogrammetry workflow is camera calibration. Whether performed automatically during photo alignment or manually using calibration data, this process determines how Metashape interprets your images and directly impacts the precision of your 3D reconstruction.
After running calibration, Metashape provides a series of camera calibration results — values that describe the internal geometry of your camera system. Understanding what these results mean is essential for diagnosing project accuracy, improving results, and ensuring your model meets professional standards.
In this article, we’ll explain the key camera calibration parameters in Metashape, how they affect your photogrammetry project, and how to interpret them effectively.
What Is Camera Calibration in Metashape?
Camera calibration is the process of determining the intrinsic parameters of your camera — the internal properties that define how light is projected through the lens and onto the sensor. These include factors like focal length, principal point, and lens distortion. Without accurate calibration, even perfectly captured images can lead to distorted or inaccurate 3D reconstructions.
Metashape can calibrate cameras in two main ways:
- Automatic calibration – The software estimates camera parameters during the alignment process using image tie points.
- Pre-calibration – You can input known calibration data from a lab calibration or other photogrammetry software.
Automatic calibration works well for most projects, but for high-precision work (such as aerial surveys or industrial metrology), pre-calibrating your camera can improve results significantly.
Key Camera Calibration Parameters Explained
After calibration, Metashape provides several parameters in the Camera Calibration dialog. These parameters fall into two main categories: intrinsic parameters and distortion coefficients. Let’s break them down.
1. Focal Length (f)
The focal length is one of the most critical calibration parameters. It defines the distance between the camera’s optical center (lens) and the image sensor. In Metashape, this value is usually expressed in pixels and labeled as f. Accurate focal length estimation is vital because it directly influences scale and depth perception in the reconstruction.
A mismatch in focal length can lead to scale errors in your model. If the value deviates significantly from the known focal length of your lens, it may indicate issues with image alignment or poor overlap between photos.
2. Principal Point (cx, cy)
The principal point (cx and cy) refers to the point on the image sensor where the optical axis intersects. Ideally, this point should be at the center of the image, but in reality, manufacturing tolerances or lens alignment can shift it slightly. Metashape estimates these offsets as part of the calibration process.
Correctly estimated principal point values ensure that image geometry is accurately reconstructed. If these values are significantly off, you may observe distortions in the 3D model or misalignments in the dense point cloud.
3. Radial Distortion Coefficients (k1, k2, k3)
Lenses, especially wide-angle ones, often introduce radial distortion — a warping effect that causes straight lines to appear curved. Metashape compensates for this using three coefficients: k1, k2, and k3. These coefficients describe how the lens distorts the image radially from the center outward.
- k1 – Corrects the primary distortion (barrel or pincushion).
- k2 – Handles secondary distortion, improving accuracy near the image edges.
- k3 – Fine-tunes distortion correction for extreme cases or ultra-wide lenses.
Well-calibrated distortion coefficients ensure that straight features in the real world are represented correctly in your 3D model. Incorrect values can lead to bending surfaces, bowed walls, or errors in measurements.
4. Tangential Distortion Coefficients (p1, p2)
In addition to radial distortion, lenses can also suffer from tangential distortion, which occurs if the lens and sensor are not perfectly parallel. This causes the image to stretch or skew asymmetrically. Metashape uses p1 and p2 to correct for this effect.
Accurate tangential distortion correction ensures that geometric features remain properly aligned. Large values here might indicate misaligned optics or camera mounting issues.
5. Skew Coefficient (b1)
The skew coefficient (b1) measures any non-orthogonality between the camera’s x and y sensor axes. Ideally, sensors are perfectly square, but slight deviations during manufacturing can introduce skew. Although usually a small effect, correcting for it ensures that measurements and reconstructions remain geometrically accurate.
6. Aspect Ratio (b2)
The aspect ratio coefficient (b2) corrects for differences in pixel scaling along the x and y axes. If the sensor pixels are not perfectly square, this parameter compensates for that variation, ensuring that distances and angles in the reconstructed model are correct.
How Calibration Results Impact Your Photogrammetry Project
The camera calibration results directly influence the accuracy, precision, and quality of your photogrammetry output. Here’s how they affect key aspects of your workflow:
Alignment Accuracy
Accurate calibration parameters improve feature matching during photo alignment. This leads to better camera position estimation, which is the foundation for the entire 3D reconstruction. Poor calibration can result in misaligned cameras, gaps in the sparse cloud, and reduced model accuracy.
Dense Cloud and Mesh Quality
Calibration results affect how depth maps are calculated from overlapping photos. Correct lens distortion correction ensures that points align accurately in 3D space, producing cleaner and denser point clouds. A miscalibrated camera might lead to noisy clouds, blurred surfaces, or distorted meshes.
Measurement Precision
In surveying, archaeology, or engineering applications, even small calibration errors can result in measurement inaccuracies. Properly interpreted calibration parameters ensure that scale, angles, and dimensions in your 3D models reflect real-world measurements.
How to Analyze Camera Calibration Results in Metashape
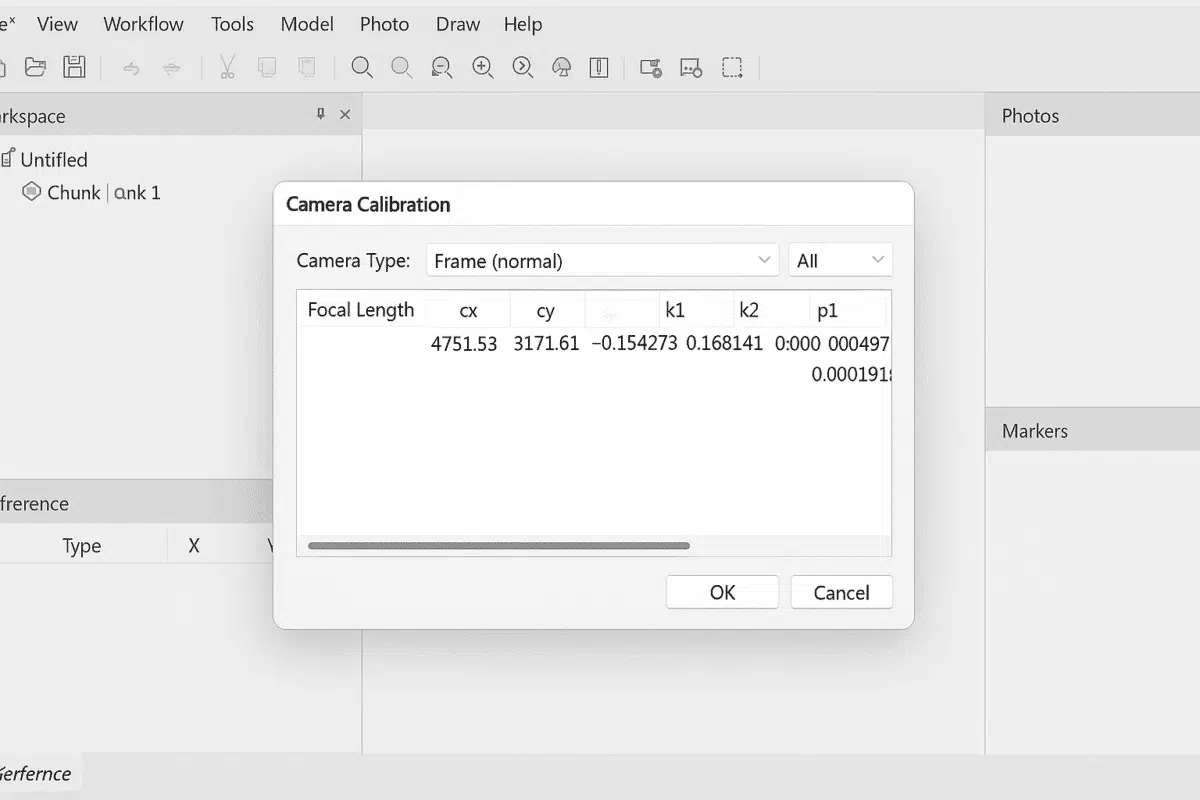
You can view calibration results in Metashape by going to Tools → Camera Calibration. The dialog displays all the parameters mentioned above. Here’s how to interpret them:
- Compare focal length: Check if
fis close to the known focal length of your lens. A large deviation might signal alignment issues. - Review distortion coefficients: Typical values for
k1range between -0.5 and 0.5 for most lenses. Extremely high values may indicate incorrect feature matching. - Check principal point offsets: Small deviations from the image center are normal. Large offsets could mean your images were cropped or the camera alignment was unstable.
- Monitor tangential and skew values: These should generally be close to zero. Large values could indicate physical misalignment or low-quality optics.
Metashape also allows you to fix certain parameters if you know them from lab calibration. Locking these values can improve reconstruction reliability and speed.
Tips for Improving Camera Calibration Accuracy
Here are some best practices to ensure your calibration results are accurate and reliable:
- Use high-quality images: Ensure sharp focus, good lighting, and minimal motion blur.
- Maintain consistent camera settings: Use a fixed focal length and manual exposure settings across all images.
- Capture sufficient overlap: Aim for at least 70–80% overlap between images to improve feature matching.
- Avoid lens zooming: Variable focal lengths complicate calibration. Use prime lenses or lock the zoom.
- Pre-calibrate if needed: For high-precision work, use a calibration target and input known camera parameters.
Conclusion: Understanding Calibration for Better 3D Results
Camera calibration is the backbone of any successful photogrammetry project. By understanding what the calibration results mean in Agisoft Metashape, you can evaluate the quality of your reconstructions, troubleshoot potential issues, and make informed decisions that lead to more accurate and reliable 3D models.
From focal length and principal point offsets to radial and tangential distortion coefficients, each parameter tells a story about how your camera captures the world — and how Metashape interprets that data. Mastering these details will elevate your photogrammetry workflow, whether you’re creating digital twins, surveying terrain, or documenting cultural heritage sites.