Agisoft Metashape Professional is one of the most advanced photogrammetry software solutions for processing aerial and terrestrial imagery into georeferenced 3D models, orthomosaics, and elevation maps. A key step in achieving accurate elevation results is understanding how to handle height above geoid within the project’s coordinate system. Without proper geoid configuration, elevation values may be referenced incorrectly, leading to vertical shifts between your model and external GIS or survey data.
This guide explains how to correctly configure and use height above geoid in Agisoft Metashape, including how to apply geoid models, manage coordinate systems, and ensure accurate alignment with ground control points (GCPs) and reference DEMs.
Understanding Height Above Geoid vs. Ellipsoidal Height
Before setting up your coordinate system in Metashape, it’s important to understand the difference between ellipsoidal height and orthometric height (height above geoid) — two distinct ways of expressing elevation.
- Ellipsoidal height (h): Measured from the mathematical reference ellipsoid (e.g., WGS84) used by GNSS systems like GPS. It doesn’t represent mean sea level.
- Orthometric height (H): Measured from the geoid — an equipotential surface representing mean sea level. It’s what most people consider “true” elevation above sea level.
The relationship between them is expressed as:
H = h – N
Where:
- H = Orthometric height (height above geoid)
- h = Ellipsoidal height (GPS height)
- N = Geoid undulation (the separation between the ellipsoid and the geoid at that location)
In most GNSS-based surveys, the data initially references ellipsoidal heights. However, many mapping standards — such as national elevation datasets, topographic maps, and engineering projects — use orthometric heights. That’s why applying the correct geoid model in Metashape is essential to avoid vertical inconsistencies.
Why Use Height Above Geoid in Metashape
When processing aerial imagery, especially from drones equipped with RTK or PPK systems, coordinates embedded in the EXIF metadata are typically expressed in ellipsoidal height. This can cause problems when comparing your model with reference data or ground control points measured in orthometric height.
By enabling the height above geoid option and linking a geoid model file, Metashape can automatically convert ellipsoidal heights to orthometric ones. This ensures your outputs — DEMs, DSMs, and orthomosaics — align accurately with local or national height systems.
Using height above geoid is crucial for:
- Aligning drone data with survey-grade GNSS measurements.
- Matching external DEMs or LiDAR datasets that use mean sea level elevations.
- Ensuring accurate volume and cut/fill calculations.
- Producing deliverables compatible with GIS standards (e.g., EPSG coordinate systems with vertical references).
How to Enable and Configure Height Above Geoid in Agisoft Metashape
Agisoft Metashape Professional supports both ellipsoidal and orthometric height references. Here’s how to set up your project correctly using height above geoid:
Step 1: Identify Your Coordinate Reference System (CRS)
Before importing photos or GCPs, determine the coordinate system your data uses. You can check the EPSG code or projection name in your GNSS export or survey report. Common examples include:
- WGS84 / UTM Zone 33N (EPSG:32633) – uses ellipsoidal height.
- ETRS89 / UTM Zone 33N + EGM96 height – uses height above geoid.
If your project’s GCPs or reference DEM use orthometric heights, you’ll need to assign a coordinate system with an associated vertical datum (geoid model).
Step 2: Download and Prepare a Geoid Model
Agisoft Metashape supports external geoid model files in .tif or .pgm formats. You can obtain these models from national geospatial agencies or international sources. Popular geoid datasets include:
- EGM96 or EGM2008 – global geoid models provided by NASA and NGA.
- National geoid models – e.g., GEOID12B (USA), OSGM15 (UK), ITALGEO05 (Italy).
Save the geoid file locally and ensure it covers your project’s geographic area.
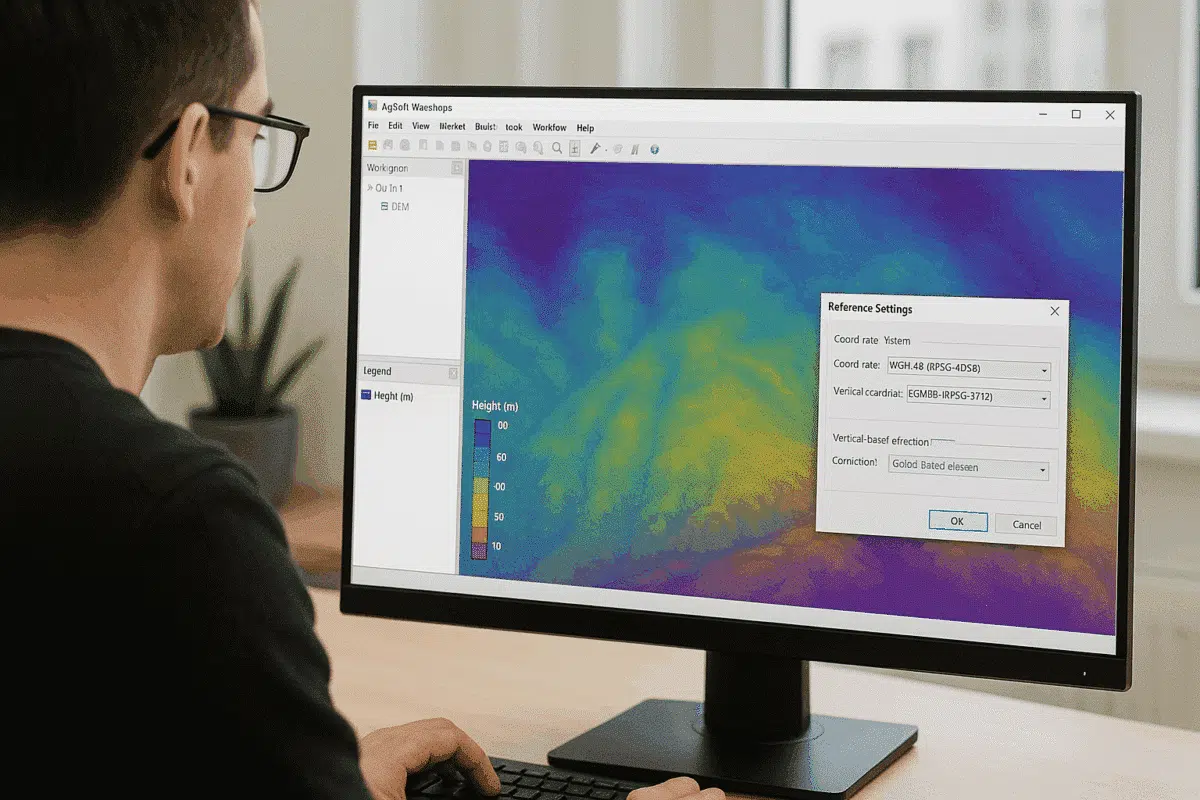
Step 3: Assign Coordinate System and Geoid in Metashape
After importing your photos and reference data:
- Go to Reference Pane > Settings.
- Click the … button next to Coordinate System.
- Select your CRS (for example, WGS 84 / UTM Zone 33N).
- Check the box Use height above geoid.
- Click Load… and browse to your downloaded
.tifgeoid file.
Once the geoid file is applied, Metashape will automatically convert ellipsoidal heights from your camera positions and GCPs into orthometric heights, using the geoid separation (N) values at each coordinate.
Step 4: Recalculate and Verify Reference Data
After assigning the geoid, reimport or recalculate your reference data to ensure vertical consistency:
- Right-click on Reference and select Update Reference Altitudes.
- Check that the Z values now match your ground control or survey data.
- If discrepancies remain, verify that both your GCP file and geoid use the same vertical datum.
You can visualize height differences by displaying the DEM or model in the Ortho view and enabling the Elevation palette in the toolbar.
Common Issues and Troubleshooting
When configuring geoid heights in Metashape, some common issues can occur:
- Incorrect vertical offset: If your model appears too high or too low compared to ground truth, check whether your GCP data and photo metadata are using the same height type (ellipsoidal vs. geoid).
- Missing geoid coverage: Ensure the geoid file covers your project’s entire spatial extent; otherwise, Metashape will fail to apply corrections in some areas.
- Wrong coordinate system: Double-check the EPSG code. Some projections have variants — one with ellipsoidal height and another with geoid-based height (e.g., EPSG:4326 vs. EPSG:4979).
- DEM export mismatch: If exporting to GIS, make sure to specify whether the output DEM uses ellipsoidal or geoid-based elevations to maintain consistency with other datasets.
Validating the Results
After applying the geoid correction, you can validate your project’s elevation accuracy by comparing it with known benchmarks or GCPs:
- Export your DEM as a GeoTIFF.
- Import it into GIS software like QGIS or ArcGIS Pro.
- Overlay it with reference survey data to check for vertical alignment.
Differences of a few centimeters are normal, but larger discrepancies may indicate an incorrect geoid model or misaligned reference system.
Integrating with GNSS and Survey Workflows
Many RTK/PPK drones and GNSS receivers offer the option to export data in ellipsoidal or geoid-based heights. To simplify workflows, it’s best to keep your data consistent from the start:
- If your drone uses ellipsoidal heights, apply the geoid in Metashape after importing the data.
- If your drone already uses orthometric heights (e.g., from EGM96 corrections), disable “Use height above geoid” in Metashape to avoid double correction.
For multi-site projects, documenting your vertical reference system in the project report ensures consistent results across teams and software platforms.
Best Practices for Accurate Height Management
- Always confirm whether your GCPs and camera coordinates use ellipsoidal or orthometric heights.
- Use official geoid models published by national mapping agencies whenever possible.
- Keep geoid and project coordinate systems in the same geographic region and datum (e.g., both WGS84-based).
- After applying geoid corrections, recheck all elevations before exporting DEMs or orthomosaics.
- Document your workflow, including geoid file name, CRS, and conversion parameters.
Conclusion: Accurate Elevation Modeling with Height Above Geoid
Using height above geoid in Agisoft Metashape Professional ensures that your elevation data reflects true ground levels relative to mean sea level, rather than the mathematical ellipsoid. By loading the correct geoid model and aligning your coordinate system accordingly, you can achieve centimeter-level vertical accuracy and ensure compatibility with national mapping standards and survey data.
Whether you’re working with drone imagery, RTK datasets, or LiDAR-derived surfaces, applying geoid height corrections is a critical step for producing reliable, professional-grade results in photogrammetry.