One of the most powerful features of Agisoft Metashape is the ability to generate profiles and cross-sections from your 3D data. Whether you are working with a digital elevation model (DEM), a dense point cloud, or a mesh, creating sections is an essential task for surveying, construction, mining, archaeology, and environmental studies. This guide will walk you through the process of generating profiles and cross-sections in Metashape, step by step, so you can make the most of your photogrammetry workflow.
Step 1: Preparing Your Dataset
Before generating a profile, you need a complete and accurate dataset. Depending on your project, this could be a mesh, dense point cloud, or DEM. Follow these preparation steps:
- Ensure your images are properly aligned and optimized in Metashape.
- Build a dense point cloud with sufficient detail for your project.
- Create a DEM or mesh if your project requires terrain or object-based cross-sections.
- Check for noise and clean unnecessary points to improve the quality of your section results.
Once your dataset is ready, you can move forward with the section tool to extract profiles accurately.
Step 2: Using the Section Tool in Metashape
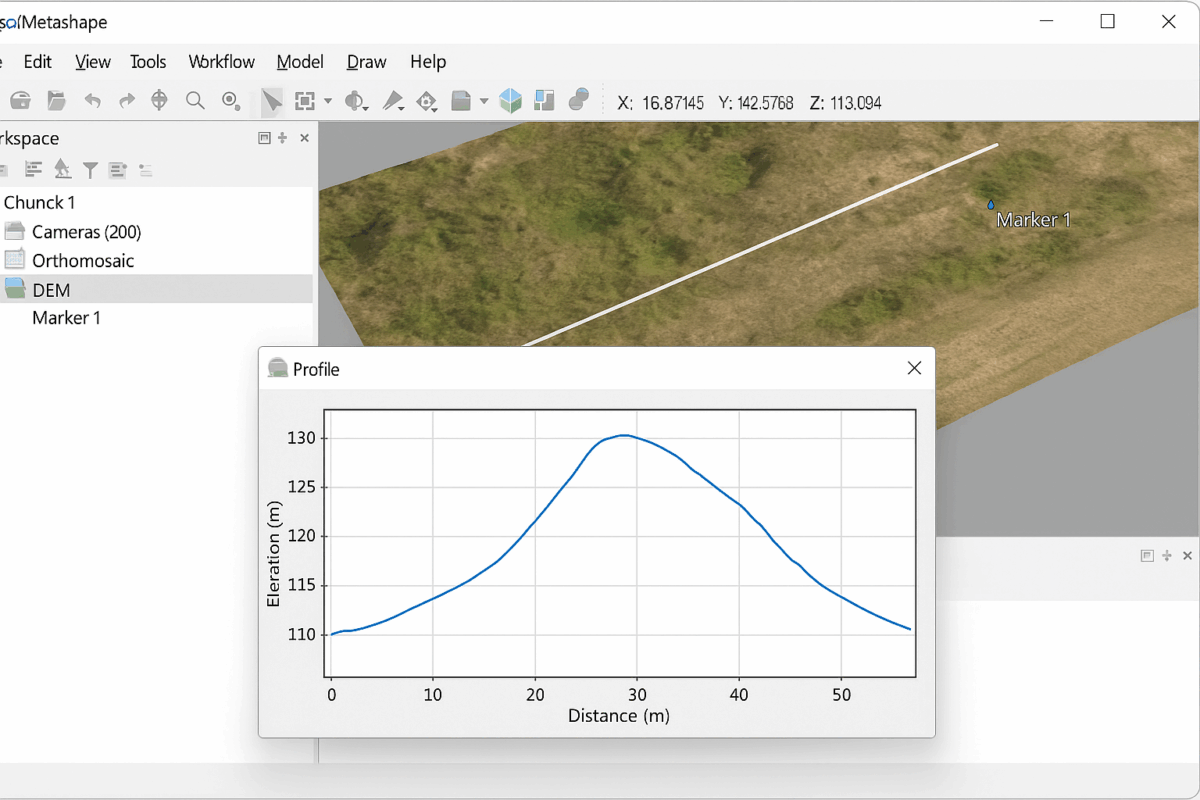
Agisoft Metashape provides a dedicated Section Tool that allows you to define a plane and generate a cross-section through your model. To use it:
- Open your project and go to the Tools > Measure > Draw Section menu option.
- Select the dataset you want to cut through (DEM, dense cloud, or mesh).
- Define two points in the 3D view to draw a line across your model. This line becomes the base of your cross-section.
- Adjust the length, orientation, and vertical exaggeration as needed for better visualization.
The section tool extracts a slice of your dataset and displays it as a profile curve. You can analyze it directly inside Metashape or export it for further processing.
Step 3: Exporting Profiles and Sections
After generating a section, you may want to save or export it for reporting and analysis. Metashape allows you to export sections as:
- CSV or TXT files containing coordinate values along the section line.
- DXF files for CAD software integration.
- SVG or PDF files for easy visualization and presentation.
To export a section:
- Select your section in the Workspace or Measure panel.
- Right-click and choose Export.
- Pick your preferred file format and save it to your local drive.
Exporting profiles is especially useful for construction planning, mining volume analysis, and archaeological documentation.
Step 4: Analyzing Profiles in External Software
While Metashape offers basic visualization of profiles, exporting them allows deeper analysis in specialized tools:
- AutoCAD or Civil 3D: For engineering design and detailed profile analysis.
- QGIS: To overlay sections on maps and combine them with other spatial data.
- Excel: For simple elevation vs. distance graphs from exported CSV files.
This interoperability ensures your Metashape profiles can be fully integrated into existing workflows for surveying, GIS, and design.
Step 5: Practical Applications of Profiles and Cross-Sections
Profiles and cross-sections generated in Metashape are valuable in many industries:
- Construction: Analyze terrain before infrastructure projects and check excavation volumes.
- Mining: Compare sections over time to measure material extraction and stockpile volumes.
- Archaeology: Study stratigraphy and layers within excavation sites.
- Environmental studies: Monitor riverbeds, coastal erosion, or landslide-prone slopes.
In all cases, the ability to visualize and quantify changes across a defined line provides insights that cannot be obtained from 3D models alone.
Tips for Better Results
To achieve the most accurate profiles in Agisoft Metashape, keep these best practices in mind:
- Use high-quality images with good overlap during data acquisition.
- Clean your dense cloud or mesh before generating sections to reduce noise.
- Set scale bars or ground control points to ensure your sections are dimensionally accurate.
- Check your section orientation carefully; a misaligned line can lead to misleading results.
These steps help ensure your cross-sections are both precise and useful for decision-making.
Conclusion: Adding Value with Profiles and Sections
Learning how to generate profiles and cross-sections in Agisoft Metashape is a powerful skill for professionals in surveying, construction, archaeology, and environmental monitoring. By preparing your dataset, using the section tool, exporting results, and analyzing them in specialized software, you can transform raw photogrammetry data into actionable insights.
Whether you are documenting historical sites, planning construction, or tracking changes in the environment, profiles and sections provide a clear, quantitative way to understand 3D models. With practice, this workflow will become an essential part of your photogrammetry toolkit.
Looking for more Metashape tutorials? Follow our blog for expert guides, practical workflows, and tips to enhance your 3D modeling and survey projects.