Agisoft Texture De-Lighter is a powerful post-processing tool designed to improve the visual quality of textured 3D models created with Agisoft Metashape. It allows users to remove shadows, highlights, and uneven illumination from texture maps, producing more consistent and realistic surface representations. Whether you’re working on digital twins, cultural heritage projects, or visual effects, mastering the Texture De-Lighter workflow can dramatically enhance the visual fidelity of your models.
This guide explains the general workflow for using Agisoft Texture De-Lighter, covering everything from texture import to shadow correction and export, along with practical tips for achieving optimal results.
What Is Agisoft Texture De-Lighter?
The Agisoft Texture De-Lighter is a standalone application developed by Agisoft to complement Metashape’s texture generation capabilities. It’s designed to automatically detect and reduce lighting gradients, shadows, and uneven exposure within texture maps. The result is a “neutralized” texture that represents the object’s true color and surface features, independent of lighting conditions at the time of capture.
This process is particularly valuable in photogrammetry and 3D reconstruction, where photos often contain strong directional light or shadows that become baked into the final texture. The De-Lighter uses advanced algorithms to separate surface albedo (true color) from illumination artifacts, resulting in more uniform textures suitable for analysis, visualization, and re-lighting in 3D environments.
Typical use cases include:
- Removing harsh shadows from drone or handheld captures
- Balancing illumination across large surfaces
- Preparing models for real-time rendering or 3D printing
- Improving color consistency for cultural heritage documentation
Preparing Your Model for Texture De-Lighting
Before using Texture De-Lighter, you’ll need a textured 3D model generated in Agisoft Metashape. The process starts with capturing high-quality images and building a complete model using the standard photogrammetry workflow — including alignment, dense cloud, mesh generation, and texture building.
1. Generate a Clean Texture in Metashape
Ensure that your texture is created with consistent settings and resolution. Use the Mosaic mapping mode with Color Correction enabled to minimize exposure differences before exporting. Avoid low-resolution textures, as the De-Lighter relies on fine pixel-level detail for accurate shadow detection.
2. Export Your Model or Texture Map
To use Texture De-Lighter, you can export either the full textured model or just the texture file. Recommended formats include:
- Model formats: OBJ, FBX, or PLY
- Texture formats: TIFF or PNG (preferred for quality)
Exporting the model ensures that geometry is available for better spatial correction, while exporting only the texture allows for faster processing when geometry isn’t needed.
General Workflow in Agisoft Texture De-Lighter
Once your model or texture is ready, open it in the Texture De-Lighter application and follow this workflow to balance and correct lighting.
Step 1: Load the Model or Texture
Launch Agisoft Texture De-Lighter and click File > Open to load your model or texture. The application supports both textured meshes and standalone texture files. Once loaded, the 3D view allows you to inspect lighting inconsistencies, shadows, and exposure gradients across the surface.
Step 2: Analyze the Lighting
The software automatically analyzes the lighting distribution across the texture. You can visualize the detected illumination gradients using the Lighting Preview mode, which highlights areas of overexposure (bright yellow) and underexposure (dark blue). This preview helps identify which regions need correction.
Step 3: Mask and Protect Specific Areas (Optional)
Before running the de-lighting process, you can define masks to protect certain areas from being modified. This is useful if your model includes intentional lighting effects (like specular highlights on metal or glass) that should not be altered. Use the masking tools to paint or select protected areas directly on the texture map.
Step 4: Apply De-Lighting Correction
Click Process > De-Light to start the automatic correction. The algorithm removes shadows, reduces hotspots, and evens out illumination intensity across the texture. Depending on the resolution and complexity of your model, processing may take several minutes.
During this step, the software computes a shading layer that represents lighting variations. It then subtracts this layer from the texture, leaving a clean, balanced surface. This process effectively separates the object’s inherent color (albedo) from lighting artifacts.
Step 5: Adjust Parameters for Fine Tuning
After the initial de-lighting, review the results in the 3D view. You can fine-tune the correction by adjusting parameters such as:
- Lighting Balance: Controls how aggressively lighting gradients are equalized.
- Shadow Threshold: Defines the sensitivity for detecting dark regions.
- Highlight Compression: Reduces excessive brightness on illuminated surfaces.
- Smoothing: Controls blending between corrected and uncorrected regions to avoid sharp transitions.
It’s best to make small adjustments and preview changes interactively to avoid flattening natural contrast or texture detail.
Step 6: Compare Before and After Results
Use the Split View or Before/After toggle to evaluate improvements. You should see a noticeable reduction in shadow intensity and overall brightness uniformity. Surfaces that appeared uneven or patchy will now look clean and consistent, suitable for use in visualization or measurement applications.
Step 7: Export the Corrected Texture
Once satisfied with the results, export the corrected texture or the entire model. Use File > Export Texture or File > Export Model, depending on your workflow. Save the output in a high-quality format like TIFF or PNG for archiving and later use in Metashape or other 3D platforms.
Re-Importing into Metashape
If you plan to continue working on your model in Agisoft Metashape, you can easily re-import the corrected texture:
- Open your project in Metashape.
- Right-click the Model in the workspace and select Import Texture.
- Choose your de-lighted texture file and apply it to the mesh.
The new texture will replace the original, maintaining the same UV mapping and geometry. This allows for seamless integration into your Metashape workflow, improving visual clarity in orthomosaics, 3D models, and exports.
Tips for Optimal Texture De-Lighting Results
- Capture images under diffuse, even lighting when possible — this reduces the need for heavy correction later.
- Use high-resolution textures to preserve surface detail after de-lighting.
- Apply masks to protect areas with natural reflections or glossiness.
- Don’t overcorrect — retain some natural shadow depth for realism.
- Combine Texture De-Lighter with Metashape’s color correction tools for the cleanest results.
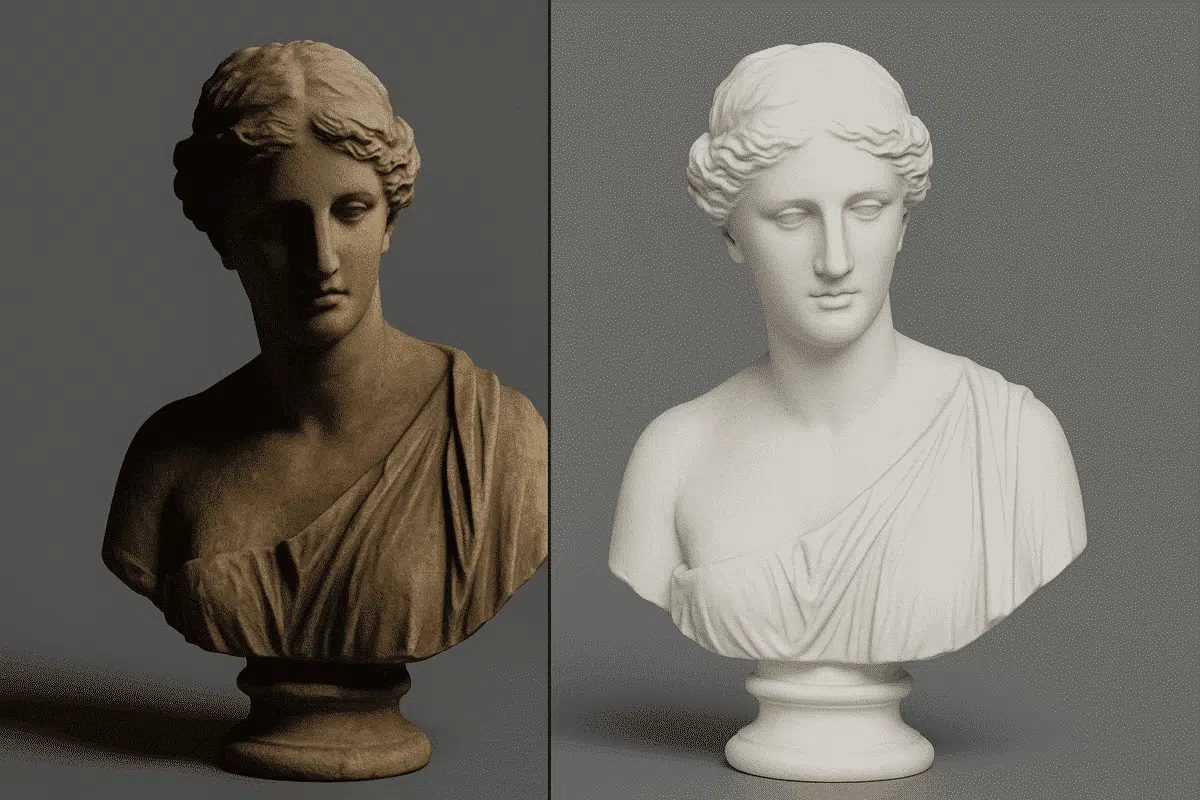
Why Texture De-Lighting Matters
Shadows and lighting variations can distort color-based analysis and reduce the realism of 3D visualizations. For example, in cultural heritage digitization, surface shadows may obscure details, while in construction modeling, uneven lighting can make textures misleading. The Agisoft Texture De-Lighter ensures that textures represent true surface properties, free from lighting biases, improving both scientific accuracy and visual presentation.
Conclusion: Achieve Consistent, Shadow-Free Textures
Mastering the Agisoft Texture De-Lighter workflow helps you create cleaner, more professional 3D models by eliminating unwanted lighting artifacts. Whether you’re refining textures for research, visualization, or commercial applications, this tool bridges the gap between raw photogrammetric textures and polished, presentation-ready results.
Integrating Texture De-Lighter into your post-processing pipeline ensures that your models maintain true surface colors, uniform brightness, and higher overall realism. By combining it with Agisoft Metashape Professional, you can achieve complete control over both geometric and visual quality — producing outputs that meet the highest professional standards.